A serious security vulnerability was discovered with macOS High Sierra that can potentially allow anybody full administrative access without a password. Anyone running macOS High Sierra 10.13, 10.13.1, or 10.13.2 who has not previously enabled the root account or changed a root user account password on his or her Mac before may be affected.
To determine which version of macOS you are using, choose ‘About This Mac’ from the Apple Menu and click on the Overview tab.
It is vital that Mac users take immediate steps to secure their systems and prevent unauthorized access.
Apple has released Security Update 2017-001 to address the issue. The update should be available through the Updates tab in the Mac App Store.
For detailed installation instructions, visit: https://support.apple.com/en-us/HT201541
How to Prevent Root Login Without a Password in macOS High Sierra
If you cannot immediatly patch your system, there are two other methods available to lock down the Root account. One option is to use the Directory Utility and the other is performed on the command line. Choose whichever you feel more comfortable doing, they both accomplish the same task.
Please contact the IT Service Desk at 978 934 4357 should you need assistance with this.
Using Directory Utility to Lock Down Root:
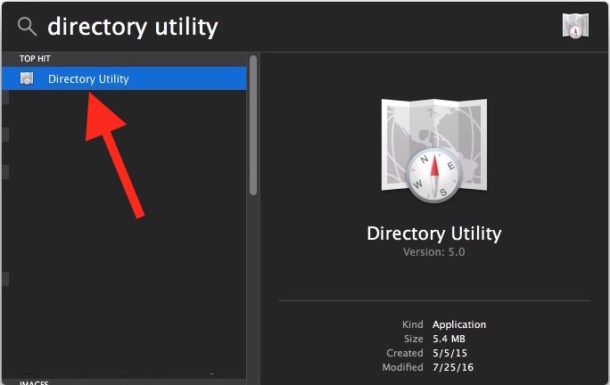
1. Open Spotlight on the Mac by hitting Command+Spacebar (or clicking the Spotlight icon in the upper right corner of the menubar) and type in “Directory Utility” and hit return to launch the app
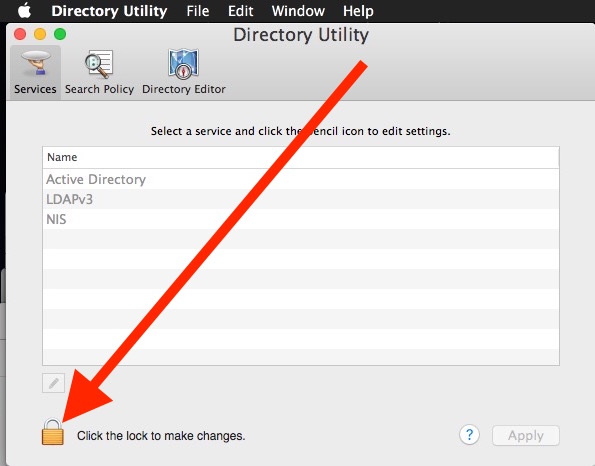
2. Click the little lock icon in the corner and authenticate with an admin account login (in most cases this is the same account you log into your mac with).

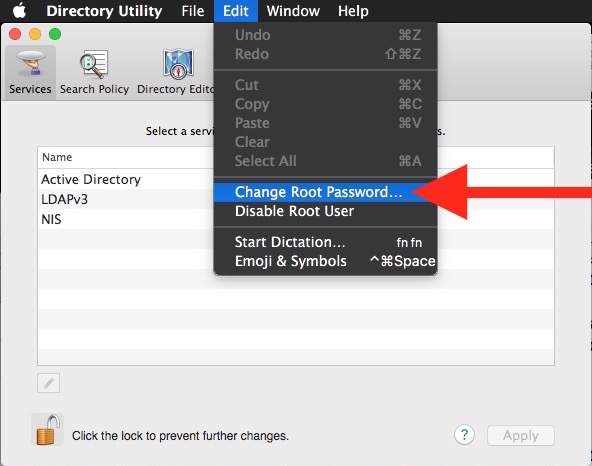
3. Now pull down the “Edit” menu and choose “Change Root Password…” (see note under step #5 if you don’t see ‘Change Root Password… in the menu’) ***

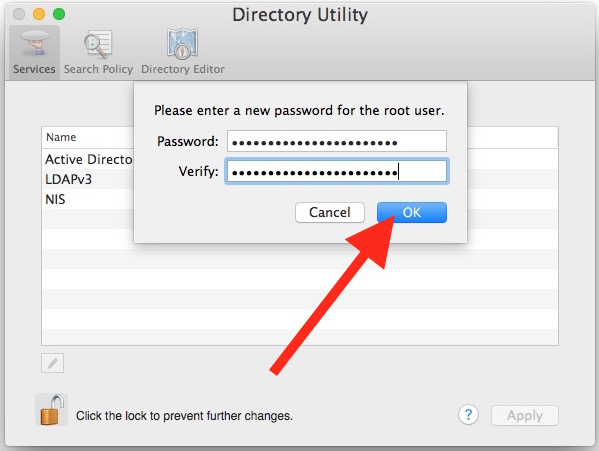
4. Enter a password for the root user account and confirm, then click “OK”

5. Close out of Directory Utility
*** If the root user account is not yet enabled, choose “Enable Root User” and then set a password instead.
Essentially all you are doing is assigning a password to the root account, meaning that logging in with root will then require a password as it should. Also, if the root account is disabled, it doesn’t mean it is secure. The root account must be enabled and have a set password.
Using the Command Line to Assign a Root Password:
Users who would prefer to use the command line in macOS can also set or assign a root password with sudo and the regular old passwd command.
1. Open the Terminal application, found in /Applications/Utilities/
2. Type the following syntax exactly into the terminal, then hit the return key:
sudo passwd root
3. Enter your admin password to authenticate and hit return
4. At “New password”, enter a password you won’t forget, hit return, and confirm it

Be sure to set the root password to something you will remember, or perhaps even matching your admin password. UMass Lowell Information Security recommends a 16 character password for optimal security.
Source: http://osxdaily.com/2017/11/28/macos-high-sierra-root-login-without-password-bug/
